Fun Halloween Crafts Created with Stencils!
Thinking about Halloween Crafts? Ready to get started with your preparations to scare up some fun? Well, it’s about that time. You know…

...for all the little ghost and goblins to come out!
Well, I have plenty of great ideas for your Halloween Arts and Crafts and this page is the center for all the fun. You'll find the links to all of the project ideas and many, many Free Halloween Stencils too.
The first Halloween Crafts project that I want to share with you is painting Halloween Pumpkin Stencils onto a pumpkin (like those pictured here). Decorating your pumpkin with paint is much less messy and safer when getting the kids involved. Not to mention that you can be a lot more creative with paint while doing your Halloween crafts.
For an artsy painted pumpkin that will not only accent your Halloween Decor but be brilliant for the whole fall season, check out these Pumpkin Decorating Ideas (and of course the free pattern is included).
Also, I found some great plastic pumpkins at my local craft supply store. These are great because I can pack them away and they’ll be good for next year - a Halloween Crafts project that keeps on spooking.
For some awesome ideas on taking pictures of your pumpkin masterpieces, check out Shutter Bombs Pumpkin Head Photoshoots!

Pssst! Making your own Costume? Creating your own alter ego for Halloween is a blast. So what are you gonna' be? A witch? A skeleton? Maybe a vampire (they're real popular right now). Click here for some Printable Halloween Masks and stencils. Starting with your mask sets the flow for the rest of the costume and here you'll find ideas for how to finish off each mask. Also, don't miss the free witch's hat pattern.
Want to make your own Halloween Masks this year (like the one pictured here)? Well start with this Free Pirate Skull Mask Pattern. It's easy to complete the costume with an old pair of jeans that you shred off at the knee and leave ragged ends hanging. Try a horizontal stripped t-shirt. You could even wrap one leg with a flexible piece of cardboard for a wooden leg. Don't forget your parrot. Enjoy!
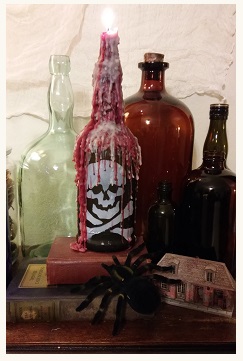
Imagine you’re in a musty, cobweb filled dungeon. The air is thick with smoke and dust and only the dim light of a single candle leads your way to a table with bottles, old books and spiders!
Too dramatic? Alright! Well, it is scary easy and fun to make this Skull and Crossbones Stencil Bottle Candleholder!
Want more of that glowey gloomy mood lighting? Then slither over to Making Tin Can Halloween Lanterns to see how you can turn an empty soup can into a spooky Jack-O-Lantern. It's easy and cheap!
Well, here's a Simple Halloween Craft to make your decorations glow! It's easy (just cutting out the stencil pattern) and very inexpensive (just a pack of brown paper bags).
There are so many ways to use stencils. It's not always about paint and here's some Halloween
Craft Ideas for making a decoration that you can display all month. It's practical, cute and easy to do. Did I mention it's cute!

If you want to bury yourself into some Halloween Crafts like these than don't miss the Free Pumpkin Stencils , Halloween Crafts and fun ideas that I share with you for using them. I made a tote bag (for collecting trick-or-treats), decorated a candy jar (for displaying treats) plus I made some cute paper gift bags for you to fill with goodies for the friendly ghosts that might be coming your way. Best of all this was done on Video for you to follow along with me personally while I share ideas and techniques.
Want a Vampire or Mummy staring from your pumpkin? Then check out these
Free Pumpkin Patterns!

If you're looking for some funny, scary or silly faces for your pumpkin then take a look at these Free Jack O Lantern Stencils (you'll find this one and two more of his toothy pals).
Maybe you want more than just the familiar toothy smile on your Jack O Lantern. Maybe you want to create a scene with your pumpkin. Why not? It's easy with stencils. No Problem - just check out these Free Pumpkin Carving Stencils to create your own Halloween masterpiece. You'll find the Black Cat in Moonlight carved into the pumpkin below and the Gonna Getcha Face painted on the white pumpkin at the top of the page. Plus The Ghost in the Doorway and The Skull.
Want more free stencils? Well, for a variety of
Free Halloween Stencils that are some of the most sought after images for the season go to
Printable Halloween Stencils. This is where you'll find scary characters like a ghost, witch, cat, skull, bat and spider. The number of ways you can use these stencils is endless. In fact these were used for the Halloween Cookie Stencils pictured below. Isn't that a scary thought!

Ready for some tasty treats made with scary Halloween Cookie Stencils? Well, I tested many ways to do just that and now I present to you the best, easiest and least expensive way to make Halloween cookies with stencils. To get there click on the blue text or on the cookie picture.
What would Halloween be without a few
free pumpkin stencils?

So, you've tried painting pumpkins with stencils as a Halloween Crafts project but now you want to do something a little more traditional, right? OK. I already gave you the links to the free Halloween stencils so check out our section on Pumpkin Carving with stencils. You can watch me as I use a stencil and carve a pumpkin in pictures.
If you like the Cat in Moonlight Stencil pattern you can find it at
Cat Stencils for Pumpkin Carving along with a few other designs.

Done with the pumpkin carving yet? No! Don't like all the mess and fuss of carving a pumpkin? But feel a strong desire to carve something? Well, I've got a great solution for you. How about carving a craft pumpkin? Well, if you're a fan of "keep it simple" then you'll love this Pumpkin Crafts idea. Use a craft pumpkin (you can find them at your local arts and crafts supply store) to carve your jack o lantern this year. No Mess! No Fuss! And boy did it come out cute.
You can carve it whenever you get the time and best of all, when the holiday is done you can pack it away and display it again next year.
Looking for a fright? Don't miss these
Scary Pumpkin Stencils that you can use to carve a pumpkin (or paint a pumpkin if you don’t want the mess of carving) and to decorate in many other ways for you Spooky Halloween Crafts.

Halloween is sneaking up on you and if you’re caught without a costume, it could be scary! Don’t scream. With a creative Mask Pattern or stencil you have the start of a unique costume. Plus you’ll have a great time making it yourself. And as you may have guessed, there are many ways to use stencils to create a costume. We are going to explore several of them here. So, let’s get to it and don’t be scared.
Below is a fun Halloween crafts book using stencils. This is only one of the many books that you can find in The Stencils Store where we have a large selection of downloadable stencils. Instant gratification at its finest! You don't need a special printer - these designs are specially formatted to print straight from your home computer on standard letter sized paper. Once downloaded, you will have your complete stencil booklet with patterns and instructions. Just click, buy and print!
Each book will come to you as a downloadable pdf file in your e-mail. Just check your e-mail after purchase for the link to connect to your file and print or save. No waiting on the mail man and no shipping fees. It's that easy!
All designs can be adjusted to fit your project size. Instructions are included. Pages are 8.5” x 11”.
If you'd rather get your Stencil Books in Print, just click the blue button below each book.

Scary Halloween Masks-
Create your own costume with these 4 fun masks - a Witch, a Skull, Frankenstein's Monster and a Black Cat.
This purchase is of a downloadable PDF file with 32 pages. All designs can be adjusted to fit. Instructions are included. Check your e-mail after purchase for the link to connect to your file and print or save. It's that easy!
Price: $9.95

To get this Book in Print for just $19.95 click here:

 |

If you'd rather get your Stencil Pattern Books in Print (like these or the one pictured above) then visit our Printer's Book Shop for a large variety of stencil collections. These books are easy to follow and come with complete instructions. You'll find all of the stencil designs used as samples throughout this site.
There are so many ways to have fun with Halloween Crafts and stencils! I often think that making the decorations is the most fun part of any occasion and Halloween is no exception. I hope you get the most of the projects found on this page and create some funky or scary art.
You may be working on your Halloween Crafts but don't forget what's just around the corner. So, come back for your Christmas Crafts and stenciling ideas.
And hey! Don’t forget that I (and everyone else) want to see what you have done with your Halloween Crafts. Just click on Stenciling Projects to get your masterpiece showcased here on this web site. Won’t that be exciting! Or if you have any questions or want to share information join in on the Stencil Blog. Well, I hope to hear from you soon.
Happy Stenciling!
Penny
P.S. Would you like to build a web site like this one and turn a passion into a business? Well, if I did it, you can too. Don't think that you have to be a web designer and know all about computer codes and complicated html stuff. I didn't. With Solo Build It! it's easy and they have the tools in place to help you build pages and teach you how to create a successful web site. Want more information? Just click on Powered by Solo Build It! and watch a cool video that will explain everything. I know you'll get excited like I did.
Return to Holiday Crafts from Halloween Crafts.


Here's a quick list of links to all of the Halloween Crafts!
Pumpkin Crafts - See how to carve a Craft Pumpkin for a no-mess forever Jack-O-Lantern.
Pumpkin Carving - Learn how to carve a Pumpkin with Stencils.
Cat Stencils for Pumpkin Carving - Free Stencils.
Cartoon Pumpkin Stencils
Free Halloween Stencils
Halloween Masks - Get some great tips for creating Halloween Masks and Costumes starting with Stencils.
Free Pumpkin Carving Stencils
Free Pumpkin Stencils
Halloween Cookie Stencils - And the Recipe too!
Halloween Crafts - Here you'll find the tid-bits on All the Halloween Crafts.
Halloween Pumpkin Stencils - And they're Free!
Jack O Lantern Stencils - More Free Stencils.
Printable Halloween Masks - Find a Free Printable Mask.
Printable Halloween Stencils
Pumpkin Patterns or Stencils
Pumpkin Stencils - Free Stencils and watch a video for ideas.
Scary Pumpkin Stencils - Free Scary Pumpkin Stencils.
Skull and Crossbones Stencil - You guessed it - It's Free!
I hope you enjoyed all of the Halloween Crafts that you found here. Come back soon for all of the
Christmas Crafts!
For art supplies, books and much more please visit our Affiliates below.
Save up to 75% on Art Supplies!
MisterArt.com has a dedicated department for stencil supplies. Here you'll find stencil films, paints, books and tools plus and extensive selection of applicators including brushes and sponges.
In these times, we're always looking for a bargain. CreateForLess has a good selection of plastic pallets for you to choose. Plus you'll find Delta Ceramacoat and DecoArt Paints, stencil brushes and applicators, a few pre-cut stencil designs, and many other items on your stencil supplies checklist.
Joann.com carries a variety of high quality acrylic paints, great for stenciling. You'll find brands like Delta Ceramacoat, Folk Art, Americana and DecoArt. They also provide paint applicators and many other arts and crafts and stencil supplies.

If it's pre-cut stencil designs that you are looking for, then I may suggest Stencil Ease . They have decorative, alphabet and industrial designs or they can custom make one for you. You'll also find Americana Acrylic Paints and other stencil supplies.
New! Comments
Please share your ideas and any variations to this project you have!