Making A Baby Elephant Applique With A Stencil
This is another chapter in an adventure to create a cute baby quilt for a friend of mine expecting a little boy this spring.
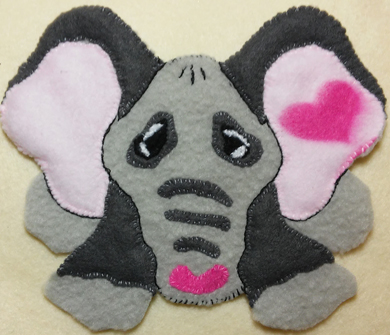
(Picture of Completed Baby Elephant Applique made from a Multi-Layer Stencil)
I wanted to share it with you because it was so much fun and I am happy to share something personal with the special people in my life.
If you want to see the first chapter in this quilting adventure, just go to Using Multi-Layer Stencils to Create Appliques.
Stencils with Multiple Layers
I used a multi-layer elephant stencil to create an applique and then attached the applique to the quilt. Easy right? And of course I have the patterns here for you to work with. Just scroll down and print them out!
You’ll see that each stencil overlay has a color suggestion but that is only a guide. You can do any colors you want so look over your pattern and decide on what colors and fabric you want to use.
As you look at the pages of the stencils below you’ll see how they can be cut out of fabric just as easy as they can be filled with paint (and without the watery mess!). I’ll step you through it with each image but it’s a piece of cake and I bet you already figured it out!
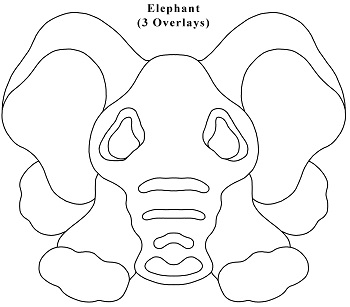
(Picture of Baby Elephant Multi-Layer Stencil Title or Guide Page)
(Print and Cut Outline From Base Fabric)
How to Break Down the Stencil Layers
This is the first page of the elephant stencil or you can consider it the pattern guide. I start by cutting the image out around the edges to use as a guide for the placement of the fabric clippings of the different overlays.
As you can see from this page, the stencil has
three overlays. So, first we need to address how creating an applique from a
stencil is different from painting with one. When you paint a stencil it’s on a
piece of paper or furniture or wall…you get the idea. It has a backing or base.
So you need to establish a base of fabric for the applique. That’s easy!
Obviously it’s going to be one of the overlays so look at your pattern and
decide which one will be the best fit to be your base and cut the outline from
this view from the color of fabric suggested on that overlay.
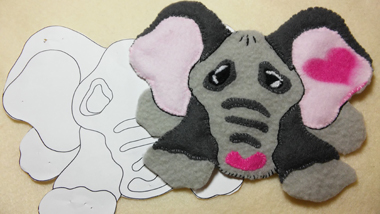
(Picture of Completed Baby Elephant Applique and the Guide Page Cut Out)
Which Stencil Overly is Best to Start With
For this stencil the best fit for the base fabric was Overlay 1. The color suggestion on Overlay 1 is Coastline Blue but I am using a light gray for that overlay so I cut my outline of the elephant stencil from light gray fleece.
Here is a picture of the clipped outline and the completed applique so you can see the start and finish side-by-side.
There are more animals on this safari so don’t
miss out on Making A Baby Tiger
Applique With A Stencil when you finish here!
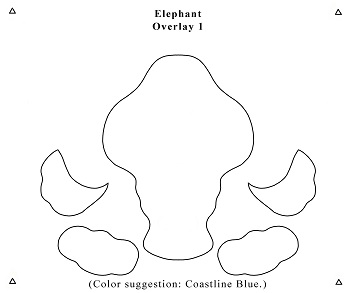
(Picture of Overlay 1 for the Baby Elephant Multi-Layer Stencil)
(Reference for Applique Only - Print for a Stencil)
Stencil Overlay 1 (Reference Only!)
This is Overlay 1. As we said earlier, the color of this Overlay was used to cut out the base fabric so you can put this page to the side – you don’t have to cut anything out from it!
You may be wondering why I added Overlay 1 here
if you don’t have to use it! Well, I included it here in case you would like to
use it for a stencil project. Maybe you want to make a quilt and then paint the
elephant stencil on a lamp shade for a theme room. Anyway, it helps to see the
whole pattern.
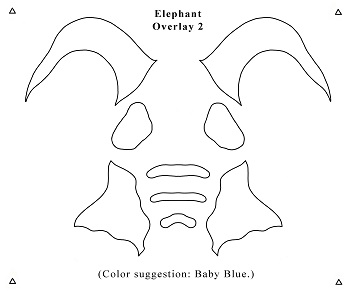
(Picture of Overlay 2 for the Baby Elephant Multi-Layer Stencil)
(Print for Applique)
Stencil Overlay 2 and Other Free Stencils
This is Overlay 2 and as you can see it represents the dark gray that I used in the applique pictured above in spite of the fact that the color suggestion is baby blue. Just so you know, I couldn’t find the nice blues that I would have loved to use for this baby boy’s quilt because it’s spring and the fleece stocks are moved out to make room for the light cottons and such. Oh well! There’s always loads of options and he’s cute as he is, right?
Hey! Don’t miss out on all the other Free
Stencils we have here!
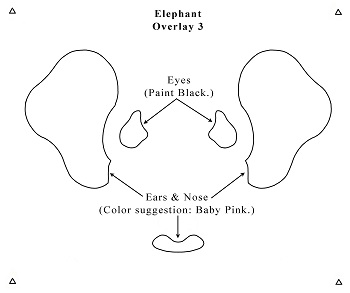
(Picture of Overlay 3 for the Baby Elephant Multi-Layer Stencil)
(Print for Applique)
Stencil Overlay 3
This is the last page, Overlay 3. Here you cut out the parts for the nose (snoot), ears and eyes.
You may notice from the pictures above that I sewed a few extra line of thread as outlines or highlights. I stitched a couple of white lines in the eyes to give the appearance of a glossy gaze, and added a few hairs at the crown of his head with a dark gray thread.
Want to find out how the Zoo Babies Quilt turned out? Go to Using Stencils in Quilting for the pictures and a quick re-cap! Enjoy!
I hope you had fun with this project and give it a try! Thanks for joining us!
New! Comments
Please share your ideas and any variations to this project you have!