Easy Snowflake Cookies
Don’t have time to set a festive mood? Here’s an easy way to make snowflake cookies!
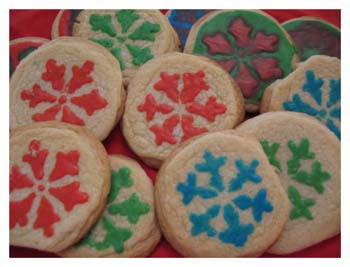
Like I always say, stencils make putting pictures in difficult places much easier. Painting images on cookies was a challenge for me (especially because I’m no Betty Crocker). I tried every complicated and expensive method I could think of only to meet with disasters. I must have gained 20 pounds eating them all, too. Well, I wasn’t going to let them go to waste. Finally I tried a simple, no fuss, use stuff already around the house method and guess what? It worked. So here’s how I “painted” snowflake cookies.
Oh yeah! Don’t miss out on the hints and tips I’ve added at the bottom of the page for some creative ideas.
First I made my snowflake stencils and that means cutting out some paper snowflakes. Do you remember how? Here are some tips.
Did you know that snowflakes are always in the six sided shape of a hexagon? Well, if you are looking for a pattern to fold a piece of paper so that you can make paper snowflakes, here is the one I created. Just click to download the Snowflake Fold Template . This pattern makes folding paper for snowflakes easy and it’s free.
To make cutout paper snowflakes , fold the paper for a six sided snowflake (using the template above). Cut away a few pieces of the paper. Remember that you will be using the design to transfer to a cookie so make sure your complete snowflake will be small enough that it will be able to fit on a cookie. Unfold carefully and flatten. Now you have a snowflake cutout design.
But to make snowflake cookies you need a stencil. So, to make a stencil, place the cutout on a sheet of stencil film (mylar or acetate). You need a material that is washable because you’ll want to use it several times. Trace around all the edges and then cut out with a craft knife. Since you are working with food, wash your cookie stencils really well and dry thoroughly. Make sure any of the tracing is gone.
Bake cookies with your favorite recipe. Since I already admitted that I’m not a baker, I’ll let you know that I used the boxed up ready to go version where you just need to add an egg. But if you are a skilled chef, go ahead and make your goodies from scratch. Sugar cookies work best because they have the smoothest surface after baking. A cookie with too much texture is not going to produce a good stenciled image. I like to slightly flatten the tops of the cookies right after they come out of the oven with a spatula. If the stencil can lay flat on the cookie you’ll get a much better image than if it has to roll over rounded edges. Let the cookies cool.
Prepare your “paint” by adding water to powdered sugar. You want to get a thick consistency that is very smooth. It doesn’t take very much water. The mixture should not drip easily off the end of a spoon. Make colors by adding food coloring.
Place the stencil on top of the cookie. Use a finger to dab the sugar mixture into the stencil openings. Just like with a regular stencil, use a dabbing or up and down motion to dot the surface with color and not a rubbing back and forth which will encourage color seeping under the stencil edges. In stenciling, you always want to use a little paint so that it does not seep under the stencil. No difference here. The best tool is an index finger to lightly dab the confectioners’ sugar and water mixture over the stencil opening. Make sure your finger is not dripping with the “paint.”
Carefully remove the stencil by pulling directly up. You don’t want to drag the stencil over the wet color mixture which will smear the color.
And Voila! You have some tasty snowflake cookies!
It might take a little practice but remember you get to eat the mistakes.
Here are those hints and tips that I promised you:
You may want to make a different size cookie than the normal 2-1/2 or 3 inch circle. No problem! Just take the paper snowflake to a copy machine and reduce or enlarge the size to fit the area you want to place the picture. Then move on to the tracing. This is great if you want to make a large cookie cake too!
If you use a recipe for a highly textured cookie, like gingerbread, oatmeal or chocolate chip, you can put a base layer of powdered sugar and water to create a very smooth area and then stencil your image on that. Actually, that can just add to how creative you can be with decorating cookies with stencils. For example, you can put a background of a red or green circle on top of the cookie behind a white snowflake. Make sure that the first layer of color has dried thoroughly before adding your image.
If you can’t find mylar or acetate at your local craft supply store, try transparency films at an office supply house. Just make sure that the material will accept pen or ink so that you can trace on it and that it will be safe to use with food items. Also, you have a large number of suppliers of stencil films on line.
Well, I hope that by now you are comfortable enough with using a snowflake cookies stencil to give it a try. It’s a great Christmas craft to get the kids involved too. I can’t think of a better craft project than one you can eat! Well, Merry Christmas and Happy Stenciling!
Hey, who wouldn't like a basket full of festive snowflake cookies! They make great gifts for the neighbors.
In an effort to bring to you a complete solution for all of your stenciling needs in one place, we now have a catalog for you to browse a large variety of designs. So, check out our Stencils Catalog for your next project.
If you’d rather get your
Stencil Pattern Books in Print (like these), then visit our Printer’s Book Shop for a large variety of stencil collections. You’ll find all of the stencil designs used as samples throughout this site.
You’re not stressing over a gift list are you? Don’t worry! I have some great ideas for creating unique gifts with
snowflake designs. It’s easy to make gifts that you can tailor make to fit the interests of your friends or family. And you may just find that you save a little money too. Need I mention the fun you’ll have designing and creating all those gifts with snowflake crafts?
If you are looking for an easy and elegant centerpiece for your Holiday table, I have just the thing. A 3-D Snowflake Centerpiece! I’ll show you how to use simple snowflake patterns to create an arrangement that you can be proud of.
If you like the 3-D snowflake centerpiece, you'll love the arrangement I made to hang from the chandelier. Want to know more? Just click on Make a Snowflake Make a Snowflake to get the details.
Now that you have tried your hand at using stencils to make snowflake cookies, how about stenciling snowflakes on fabric for more gift and decoration ideas. I have a few more snowflake crafts and projects that will help you make the holiday merry!
Enjoy your snowflake cookies!
P.S. Would you like to build a web site like this one and turn a passion into a business? Well, if I did it, you can too. Don't think that you have to be a web designer and know all about computer codes and complicated html stuff. I didn't. With Solo Build It! it's easy and they have the tools in place to help you build pages and teach you how to create a successful web site. Want more information? Just click on Powered by Solo Build It! and watch a cool video that will explain everything. I know you'll get excited like I did.
Return to Home Page from Snowflake Cookies.
Return to Christmas Crafts from Snowflake Cookies.


If you love making things then Christmas is the very best time of year. This site has so many ideas that I wanted to put all the links to Christmas Crafts at your fingertips - after all, time is of the essence this time of year! Enjoy and Merry Christmas!
Angel Stencil - Free Angel Stencils.
Christmas Art Activities - Decorate Ornaments with Stencils.
Christmas Art Craft - Find great ideas for making Tree Skirts with Stencils.
Christmas Art Ideas - Watch a Video for more Christmas Craft Ideas.
Christmas Art Prints - Find a new way to use Holiday Decorations.
Christmas Art Projects - Watch a video about using Stencils to create in different ways other than with paint.
Christmas Card Templates
Christmas Arts and Crafts - Make a beautiful candle holder with Stencils.
Christmas Card Ideas
Christmas Craft Activities - Use Stencils to make unique Stockings to hang by the fire.
Christmas Crafts
Christmas Craft Ideas - Decorate Gift Bags.
Christmas Craft Patterns
Christmas Projects - Decorate unique Gift Tags.
Christmas Stencils
Christmas Tree Stencils
Free Christmas Stencils
Gingerbread Man Stencil - Ideas and a Free Stencil.
Holiday Crafts - Here is the place for all your Holiday Crafts.
Holiday Stencil - Watch a Video with a unique way of using Stencils for Holiday Decorations.
Homemade Christmas Crafts - See how to use Stencils to embellish cloth napkins.
Make a Snowflake
Paper Snowflakes
Printable Christmas Stencils
Snowflake Cookies
Snowflake Crafts - Gift and Decoration Ideas with Artful Snowflakes.
Snowflake Designs - Here is where you'll see how to put your Snowflake Designs to use making unique gifts.
Snowflake Patterns - Make 3-D Snowflake Decorations.
Well, I hope you enjoyed all the
Christmas Crafts and please come back year round for many other decorating ideas with Stencils!
For art supplies, books and much more please see our Affiliates below.
Save up to 75% on Art Supplies! MisterArt.com has a dedicated department for stencil supplies. Here you'll find stencil films, paints, books and tools plus and extensive selection of applicators including brushes and sponges. In these times, we're always looking for a bargain. CreateForLess has a good selection of plastic palettes for you to choose. Plus you'll find Delta Ceramacoat and DecoArt Paints, stencil brushes and applicators, a few pre-cut stencil designs, and many other items on your stencil supplies checklist. Joann.com carries a variety of high quality acrylic paints, great for stenciling. You'll find brands like Delta Ceramacoat, Folk Art, Americana and DecoArt. They also provide paint applicators and many other arts and crafts and stencil supplies.

If it's pre-cut stencil designs that you are looking for, then may I suggest Stencil Ease. They have decorative, alphabet and industrial designs or they can custom make one for you. You'll also find Americana Acrylic Paints and other stencil supplies.
New! Comments
Please share your ideas and any variations to this project you have!