Using Multi-Layer Stencils for Quilting
See how using multi-layer stencils for quilting can add a personal touch by including an image close to your heart!

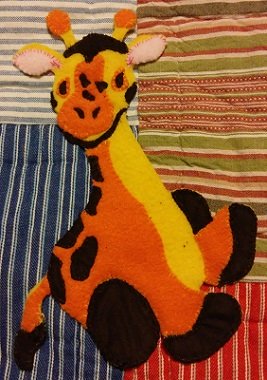
(Picture of Completed Baby Giraffe Applique made from a
Multi-Layer Stencil)
Have Fun, Relax, Create!
Crafting and creating is great stress relief! It helps us focus on something fun and allows us to unwind. And the satisfaction of the end product is uplifting. But having an end product that is useful is most satisfying. Quilting is just that. Quilts color our beds, keep us warm and make great gifts!
Adding images to a quilting project is raising the fun a level or two and it can be easy to do with multi-layer stencils. Yeah! That’s right! Stencils! I know you are thinking that stencils are only good for paint but you can do many different things with them. After all, stencils are just a pattern for a design right?
Two Ways to Quilt With Multi-Layer Stencils
There are two ways to add stencil images to quilts. The first is Using Multi-Layer Stencils to Create Appliques and then attaching the appliques to the quilt. This is a good way to have pictures or images floating on a solid surface quilt. For example, I made this baby quilt (above) of a solid white soft cotton and attached a zoo baby in each corner. This is the giraffe baby stencil that we’ll use as an example for this project idea. You’ll find the patterns for him as you scroll down this page.(Pssttt! The link above will give you the baby zebra stencil that matches this little giraffe – Enjoy!)
(Picture of Completed Baby Giraffe Applique on a Patchwork Quilt)
The second way of using multi-layer stencils for quilting is to simply use the stencil parts just like a pattern, sew them together and sew them onto a quilting square.
Depending on the design you are using, one of these methods will
be easier than the other. For the giraffe multi-layer stencil, sewing the
pieces on top of a cut out of the outline is the easiest method because of the
spots and eyes that float in the middle of the design. You may have a pattern
that would be easier to attach together with seams that can be hidden in the
back.
Making a Multi-Layer Stencil into a Sewing Pattern
Multi-layer stencils offer more detail than a simple single layer stencil. But the basic structures are the same. The closed areas of a stencil, cut out to make openings for paint, are called “islands.” The parts left block paint from the surface and holds the stencil together are called “bridges.” Think of the islands as a normal sewing pattern and cut out in the color or pattern of fabric for your design.
Remember, if your fabric is going to fray and you need to turn it under to sew to the quilt or if you are sewing the pieces together with a seam than leave space for this when you cut out the islands.
Above is a picture of the giraffe multi-layer stencil applique sewn onto a patchwork quilt. Using multi-layer stencils for quilting can be done in so many ways it’s crazy. I’m just able to give you some snippets of ideas here but I know you’ll take them and run with it!
Since I mentioned simple single layer stencils above, you can see how they are used in creating appliques too by going to Using Stencils To Create Appliques!
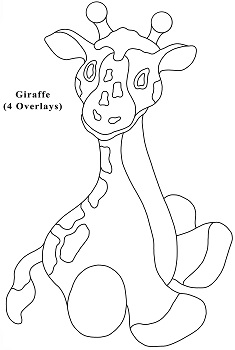
(Picture of Baby Giraffe Multi-Layer Stencil Title or Guide Page)
(Print and Cut Outline From Base
Fabric)
The Title Page - Your Guide
This is the Title Page for the Multi-Layer Stencil of the baby giraffe. It will guide you to how the following pieces fit together.
One thing to remember is that
stencils are designed for paint so you may need to make some minor adjustments
when using the pattern with sewing fabric. For example, a multi-layer stencil
may have areas that allow an overlapping of paint. If you are using the pattern
for an applique and sewing the fabric together in layers then you’ll probably
be Ok. But if you are sewing the pieces together with a seam then you may need
to adjust any of the parts that would cross over. Let’s take the giraffe baby
stencil. The brown spots on the back and face would be painted over the orange
color. So, you could sew the larger pieces together and then add the small
spots on top. I’m sure you can come up with many other ways of putting this
together but that is only one option.
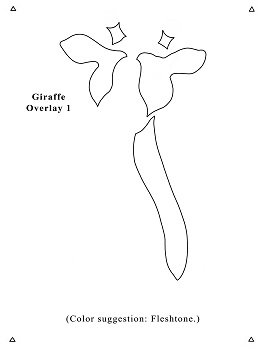
(Picture of Overlay 1 for the Baby Giraffe Multi-Layer Stencil)
(Can Be Omitted if Flesh-tone is Used to Cut Out Base)
Page 1 of the Multi-Layer Stencil
This is the first page of the multi-layer stencil. This page provides the areas that are yellow in our example: the chest and belly, parts of the face, ears and horns (if that’s what they are called).
If you are creating the
applique and cutting a base fabric from one of the colors in the design then
you can use the color of this pattern (yellow) or the second page (orange)
pictured just below. In other words, if you cut a base fabric from yellow then
you can skip this page. If you cut a base fabric from orange then skip the
parts on the second page.
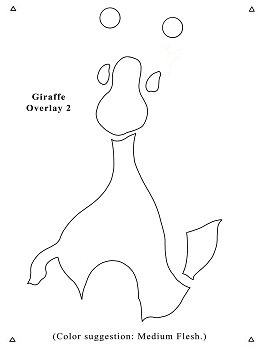
(Picture of Overlay 2 for the Baby Giraffe Multi-Layer Stencil)
(Can Be Omitted if Medium Flesh is Used to Cut Out Base)
Page 2 of the Multi-Layer Stencil
This is the second page of the multi-layer stencil. This page provides the areas that are orange in our example: the back and legs, face and tips of the horns (again, if that’s what they are called).
By the way, I used fleece for this project because it’s for a baby blanket and needs to be very soft but I found that fleece is a great fabric for creating appliques and quilting. Of course, it’s soft but the edges don’t fray and that’s a real bonus.
The
giraffe stencil applique has a friend so don’t miss out on Making A Baby Elephant Applique With A Stencil!
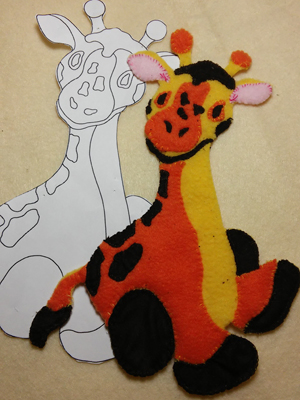
(Picture of Completed Baby Giraffe Applique and the Guide Page Cut Out)
Here is an image of the completed giraffe applique and the cut out of the multi-layer stencil used for pattern placement. Side by side it’s clear to see how the outline will guide you in the placement of the stencil islands.
Some other quick tips that I played with:
I used a dark pink thread to sew on the ears so that they have a shaded outline and then ran a couple of lines of white thread in the eyes to offer a life-like glassy gaze.
OK! Making a Baby Tiger Applique With a Stencil is all ready for you now!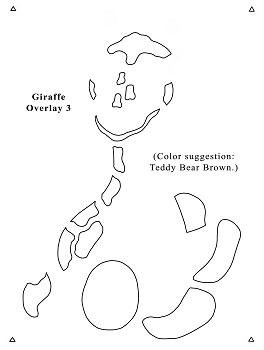
(Picture of Overlay 3 for the Baby Giraffe Multi-Layer Stencil)
(Print for Applique)
Page 3 of the Multi-Layer Stencil
This is the third page of the multi-layer stencil. This page provides the areas that are brown in our example: the feet, tail and spots.
Want to find out how the Zoo Babies Quilt turned out? Go to Using Stencils in Quilting for the pictures and a quick re-cap! Enjoy!
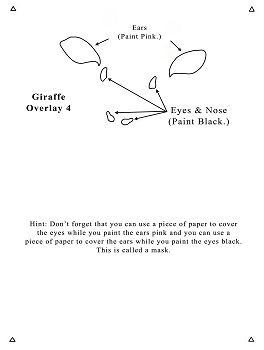
(Picture of Overlay 4 for the Baby Giraffe Multi-Layer Stencil)
(Print for Applique)
Page 4 of the Multi-Layer Stencil
This is the fourth page of the multi-layer stencil. This page provides the areas that are black and pink in our example: the eyes, nose and ears.
This should give you a few ideas about using multi-layer stencil for quilting but most importantly you get a free stencil pattern to play around with. I will be adding some of his friends from time to time as I work with them on other projects so keep checking back. Enjoy!
Penny
New! Comments
Please share your ideas and any variations to this project you have!