Using Multi-Layer Stencils to Create Appliques
When we think about stenciling the image of paint comes to mind immediately but stencils lend themselves well with other media like paper or fabric for many different craft projects.
Let’s take fabric and explore how to make pictures or appliques of the stencil design.
We’ll be working with multi-layer stencils for this project but if you want to start with something a little easier than read all about Using Stencils to Create Appliques to see how to work with a basic stencil.
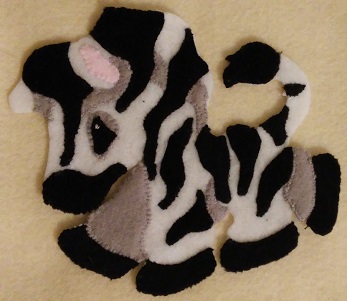
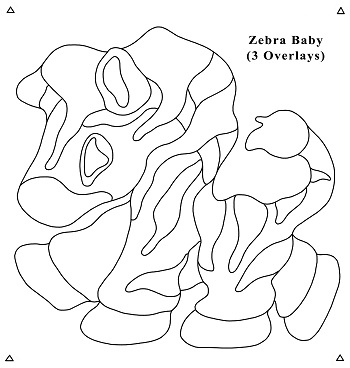
The image we’ll be using for this project is the Baby Zebra. You can find the patterns for this applique below to print and I’ll step you through the process.
This little cutie is part of the Zoo Babies: A Collection of Stencils which is a downloadable e-book that you can find at Stencils.
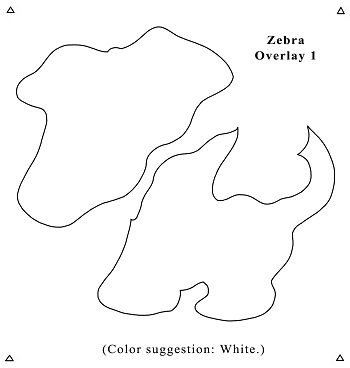
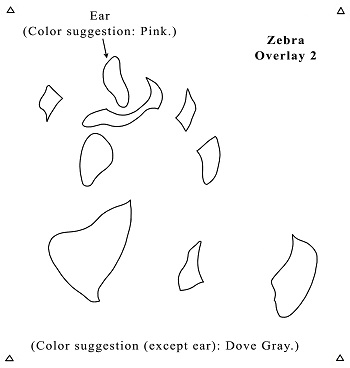
Once you’ve printed your stencil or applique patterns (four images below), notice the layers of the stencil and the color suggestions. Normally, the enclosed areas of a stencil are cut out to make openings for paint. These are called “islands.” The paper left which blocks paint from reaching the surface and holds the stencil together are called “bridges.” Think of each layer as a normal sewing pattern and cut the islands out in the color or pattern of fabric for your design.
Want to find out how the Zoo Babies Quilt turned out? Go to Using Stencils in Quilting for the pictures and a quick re-cap! Enjoy!
Stencils... (Oooppss!) - Applique Patterns
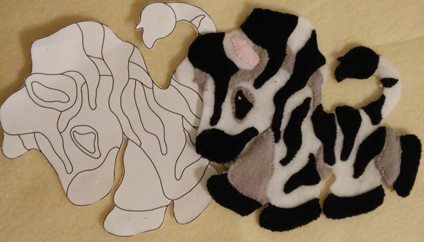
Now that you have all the pieces/parts cut out you’ll need something to attach them too, right? OK! Use the outline of the sample image to cut out your base fabric. If you are working with a stencil that does not have a sample or outline of the completed design then use the stencil itself to create an outline. There are two ways to do this. First, of course, is to draw the outlines of the islands of the stencil and then use the outer edge as the outline to cut out your base. Second, is to use tracing paper to trace the stencil islands to get your outline pattern.
The image above is the one I am using in this craft project as the outline for the zebra applique. You can see it cut out in the photo above with the finished applique.
When painting with a mulit-layer stencil, you would line up each layer so that the painted colors fill in to complete the design. The only difference here is that you will be doing it by layering the cut pieces of fabric. And just think…you don’t have to wait for the paint to dry!
You can attach the pieces of fabric by sewing them on by hand or with your sewing machine. But if you’re not in the mood to sew, gluing them in place will work. Just realize that most glue will make the fabric stiff so if you are going to use the appliques on clothing or in a quilt, try to find glue for fabric.
I am using very soft felt and fleece, and sewing them together for this applique because I intend to attach it to a baby quilt so it has to be very soft.
For the zebra baby applique, I cut the outline from a soft piece of white felt. Therefore, that makes the first overlay (above) not necessary. But I added it here for you to have in case you decide to do a painted stencil also. It’s great to have because maybe you’ll make a baby blanket like I’m doing and then want to paint this little guy on a piece of furniture or something.
Using the Stencils to Create an Applique
I arranged the dove gray and pink (from Overlay 2 above) in place with pins and hand stitched to the white felt base fabric and so on with the black (fleece) fabric (from Overlay 3 below).
And there’s my baby zebra all finished at the top of the page! Isn't he darlin'?
The next step in this project is Using Multi-Layer Stencils for Quilting! where you’ll find the giraffe baby stencil applique for quilting pattern.
I hope you like this stenciling project and will join us for more great ideas! See ya soon! Penny

New! Comments
Please share your ideas and any variations to this project you have!